Assessments
Assessment is one of the most important modules of Salute, allowing users to conduct Assessments, Audits, Inspections, or Surveys of any part of the organization.
Assessments can be started in three ways:
-
From the Assessment module
-
From an item detail page
-
From an Assessment Queue
This guide will provide examples of each.
Start an Assessment from: Assessment Module
Instructions
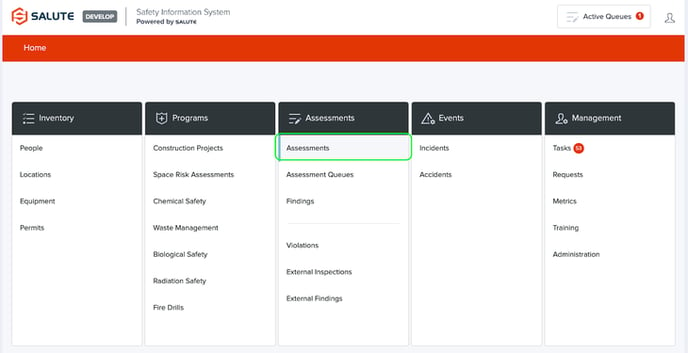
To access the Assessment Module:
From the Salute Portal landing page, select Assessments from the Assessments modules
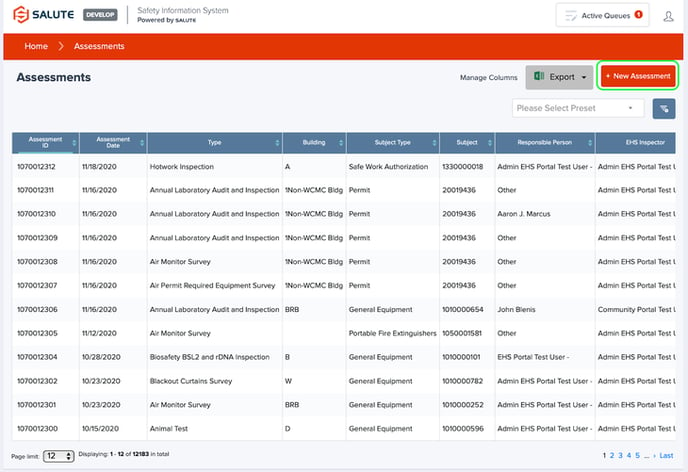
From the Assessments Module landing page, you can:
-
Select an individual assessment to see more detail
-
Filter the list by selecting a column header (can do multiple filters) to see a select list of items
-
Create a new Assessment
-
Export the Assessment to excel for additional analysis
You can select the “+ New Assessment” button in the upper right to start a new assessment
From the new Assessment Screen, you will be asked to provide the following information:
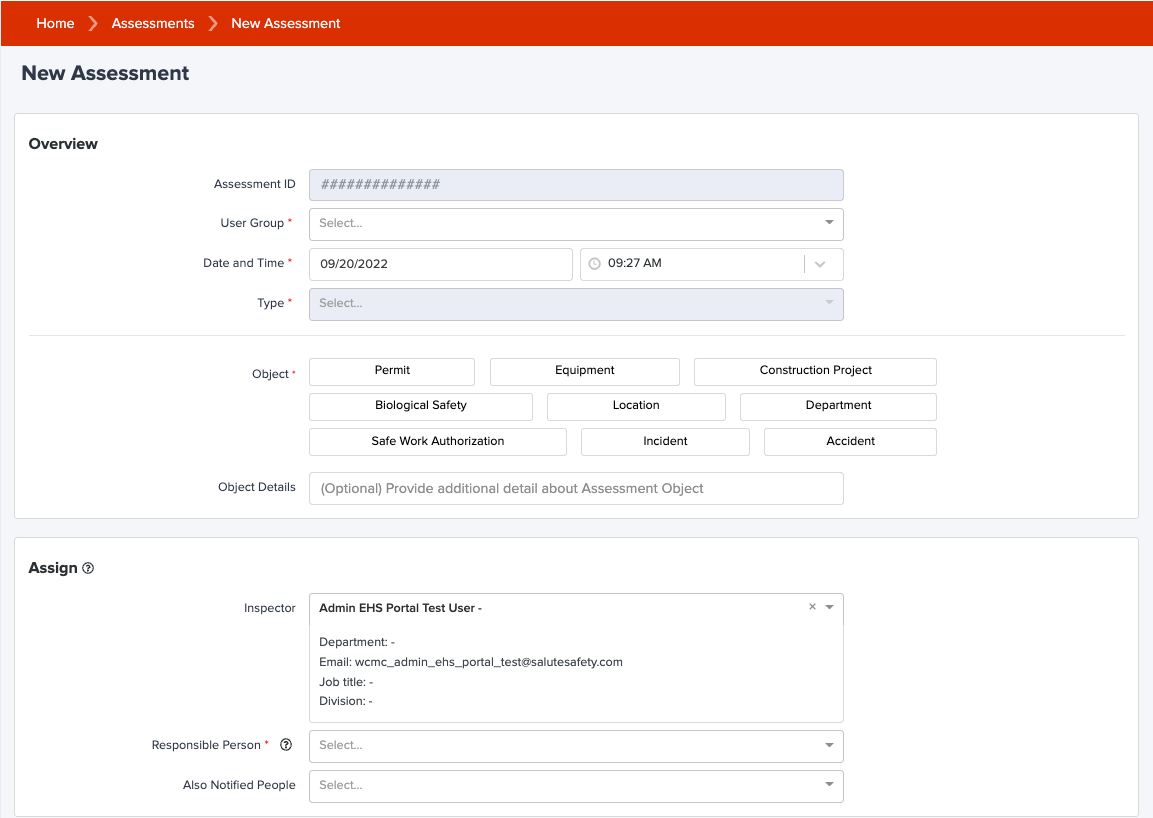
Overview
-
User Group (This field only applies if you belong to multiple groups)
-
Date and Time (pre-populated)
-
Type - Once a User Group is selected, the available Assessment types will appear. Once a type is selected, the checklist below will become available
-
Object - Selecting an object of the Assessment is a critical step for ensuring data integrity. A few examples
-
If you are conducting an Annual Chemical Hood Assessment, select Equipment> Chemical Hoods and then find the specific hood
-
If you are conducting a lab survey, you can select Location> Space and then search for and select the specific space the assessment is covering
- Note: the options to choose from for Object will be determined by the Object Types that that Assessment has access to
-
-
Object Details- If there are any notes the Inspector wishes to add the object details, they can be provided here
Assign
-
Inspector - This is the person responsible for filling out the checklist. It will pre-populate to the user that is creating the assessment
-
Responsible Person - This field is for assigning you will be responsible for reviewing the outcome of the Assessment. This may be a manager of a space, an owner of a piece of equipment, and the head of a department.
-
Also Notify - You can also add additional people who will receive notifications related to this assessment and be able to login and view the assessment from the community portal
Note: Hover over the tool tip in the Assign section for more information on email notifications that are sent to the People listed in these fields.
-
Once the Overview is complete, the user can fill out the Checklist items below
-
There is a variety of possible question types, including Yes/No/N/A, Numerical, Range, Freetext, or Dropdowns
-
Each Assessment Type has a unique Checklist (Admin users are able to create/edit/manage Assessment Type within the Administration module. See Administration for more detail)
-
As the user completes the checklist, they have the ability to add comments or attachments to each line item by selecting “+Comment/File”
-
If an issue is observed, users can select “Add Finding +”
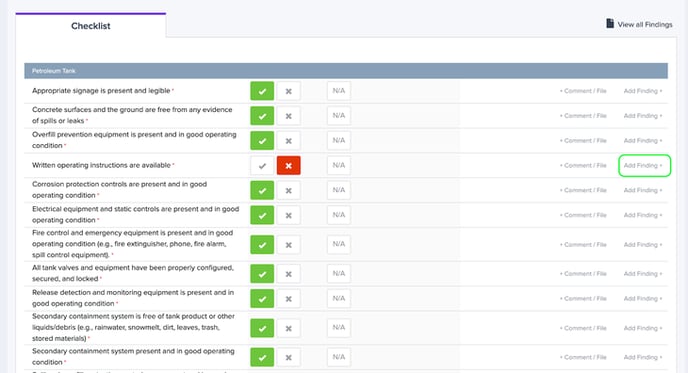
Creating Findings
One of the primary workflow from Assessments is Findings, which are created to record an issue that is observed during the assessment and/or generate follow-up work that needs to be completed by someone within the organization.
By selecting “Add Finding +” on a line item, a form will appear on the screen to track specific details of the finding:
Overview
-
Initiated Date: Date Finding is created
-
Finding Type: This is selectable based on the library of finding types. This will default to the corresponding Checklist item and will pre-populate much of the information in the finding form
-
Finding: A place to provide more information about the specific finding. This field pre-populates based on the Finding Type selected.
-
Corrective Actions: What is required to be done based on the Finding. This field pre-populates based on the Finding Type selected.
-
Website info: can be used to provide external links
-
Object: Similar to assessment, the object is used to determine the specific item the finding should be attributed to. In this case, the object will pre-populate to whichever Object was selected for the assessment
-
Attachments: Can be used to provide reference material, including pictures. When accessing Salute from a mobile device, selecting the add attachment feature will show an option to bring up the native camera application
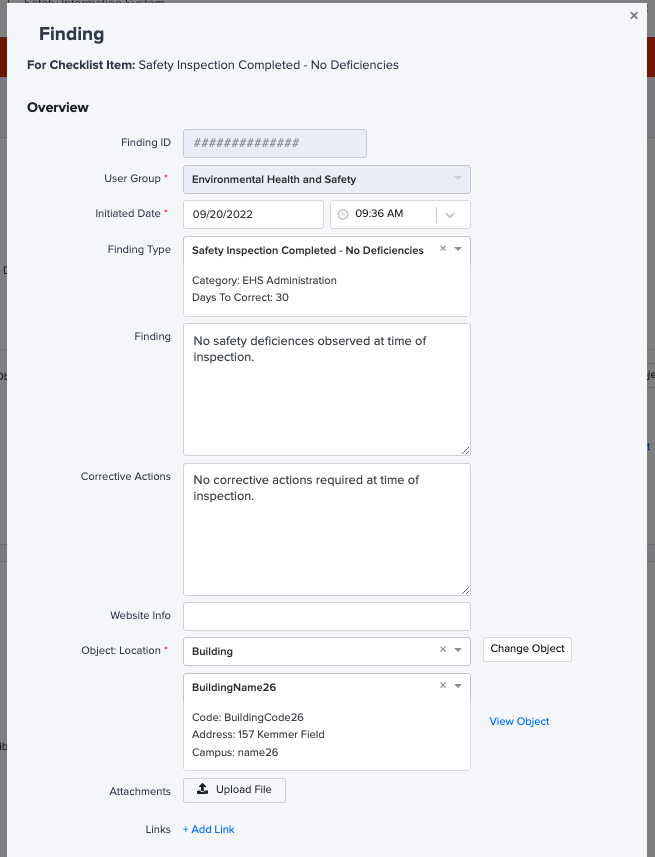
At the bottom of the finding form is a section for Corrective Actions completed. This can be filled out by the creator of the finding, or it will be assigned to the Responsible Person who will be able to respond to the finding with Corrective Actions on the community portal.
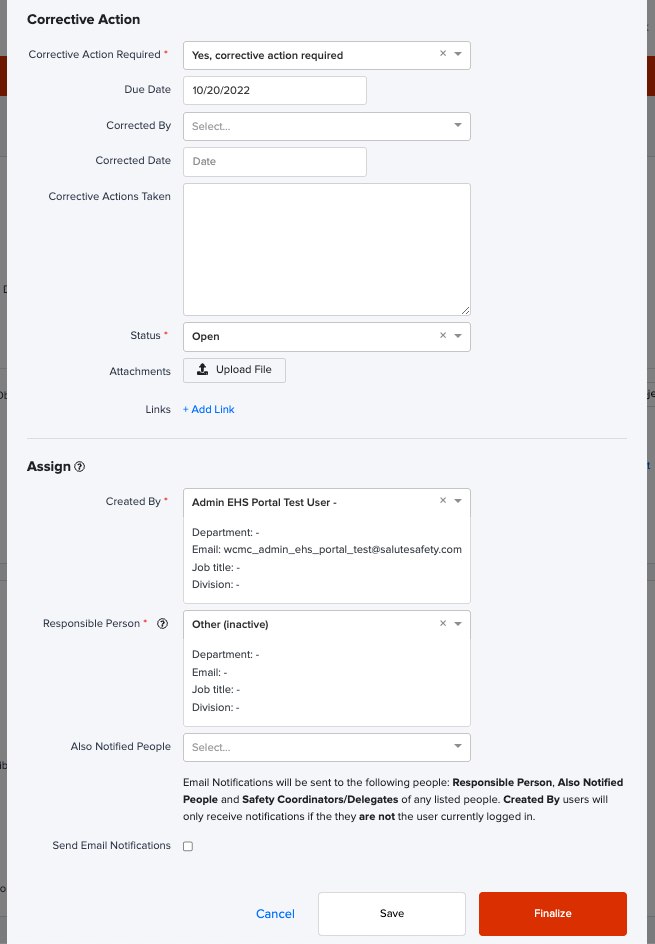
Corrective Actions
- Corrective Action Required: Used to flag if the safety team requires that corrective actions be recorded before finalizing/closing out a finding
- Due Date: If not automatically populated, enter a Date by which this Corrective Action should be completed by.
- Corrected By: The person who completed the Corrective Action.
- Corrected Date: The date the Corrective Action was completed.
- Status: If Open, this Finding has not had Corrective Action completed yet. If Completed, this Finding has been Marked as Completed on the Community Portal by the Assigned Responsible Person. If Finalized, this has been closed out by EHS.
- Attachments: Include documentation of Corrective Actions Completed.
Assign
- Created By: This will default to the user logged into the system
- Responsible Person: Similar to attachment, the person ultimately responsible for ensuring the corrective action takes place
- Also Notified: Similar to Assessment, this field is used to provide other people access to the finding on the Community portal and to receive notifications related to this finding
Note: Hover over the tool tip in the Assign section for more information on email notifications that are sent to the People listed in these fields.
Important: Only check off Send Email Notifications if you are trying to Send Email Notifications if you would like Email Notifications to send to these individuals immediately. Otherwise, you will have an option at the end of the Assessment to send notifications all together.
Conducting an Assessment with Conditional Logic
- When users conduct an Assessment built with conditional logic, the conditional questions will display when the conditions defined are met.
- If a string of conditional questions are answered, and the user then changes a preceding question, the conditional questions that were answered will no longer be displayed.
- Note: If a string of conditional questions are answered, the User has added a FINDING to a conditional question, and the user then changes a preceding question, the conditional questions that were answered will no longer be displayed EXCEPT for the question that has had the Finding added to it.
Saving and Finalizing
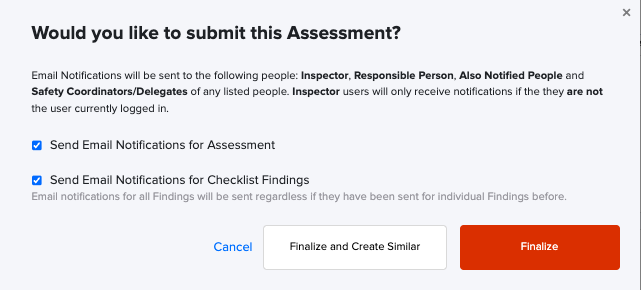
At the end of any Assessment, you will have two options: Save or Finalize.
- Saving an Assessment will keep it in the Open status, and the Assessment will still be editable.
- Finalizing an Assessment will change the status to Finalized, and the Assessment will not be editable unless reopened.
Upon Saving or Finalizing, the Assessment is made available to the People listed in the Assign section on their Community Portal. However, they will only receive email notifications of this, depending on the settings checked upon Saving or Finalizing.
When Saving, Email Notifications will NOT be sent by default if there are Findings with this Assessment, but a User can choose to have them send as needed. This includes options to send or not send email notifications for Findings in the Assessment as well.
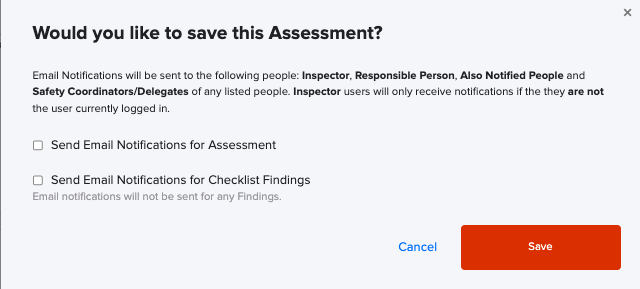
If you chose to have Finding notifications send at the Finding level already AND you choose to have them send here, your Responsible Persons, Delegates, and Also Notified will all receive these notifications TWICE.
When Finalizing, Email Notifications WILL be sent by default, but a User can choose to NOT have them send as needed. This includes sending of all notifications related to Checklist Findings as well.
Assessment from: Item Page
A common workflow in Salute is to launch an Assessment from the detailed page of an object (location, equipment, permit, etc) within the system. This can be started by navigating to that items page in your browser (see relevant section of this User Guide) or by scanning a QR code associated with this item.

To start an Assessment:
-
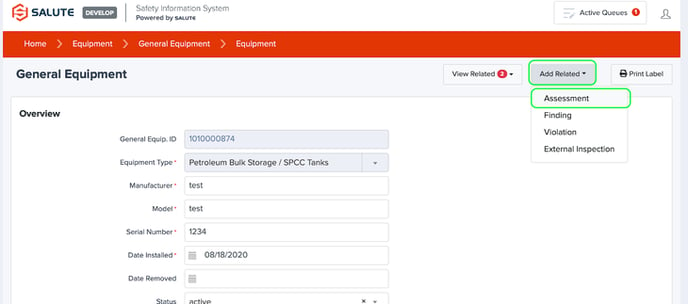
Select “Add Related” at the top of the item page, and select “Assessment”
-
Once selected, the user will be redirected to a New Assessment with fields such as object and responsible person pre-populated based on details from the original item
Assessment from: Assessment Queues
Assessment Queues are a unique and powerful tool from Salute that enables you to schedule and assign one or more Assessments to be conducted.
To create an Assessment Queue:
-
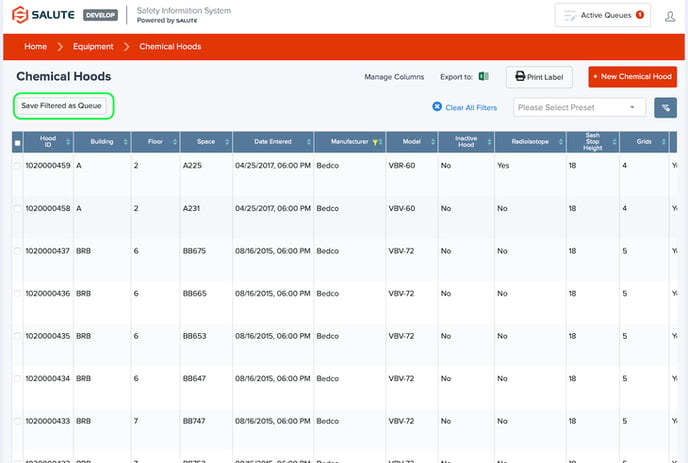
Visit the landing page for any object of an assessment, such as Chemical Hoods.
-
Create any filter, and the Button “Save Filtered as Queue” will appear.
-
Select “Save Filtered As Queue” to create a new Assessment Queue
-
You will be redirected to a New Assessment Queue page
-
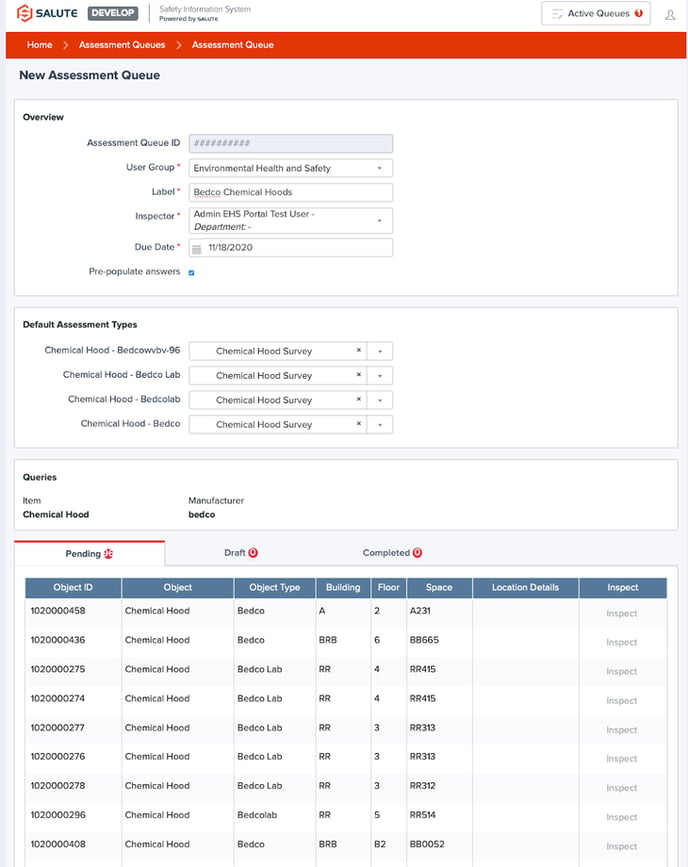
From the New Assessment Queue page, you can define:
-
User Group: Define the group of users that will have access to this Assessment Queue (if applicable)
-
Label: Provide an easy to remember label that is consistent with the best practices established by your organization
-
Inspector: Determine who will be responsible for conducting the Assessments in the Queue. This must be one person, but this can be anyone within your organization as long as they have been given the appropriate access by an Admin user. (Contact an Admin within your organization to determine if this user has the right level of access)
-
Due Date: Determine the date by which all assessments in the Queue should be complete
-
Pre-populate answers: If selected, the questions on the checklist will default to Yes, or if a dropdown they will default to the first value. This is used when there is a large volume of assessments and the Inspector is primarily validating that everything was done
-
Default Assessment Types: For each type of item in the Queue, define which Assessment Type should be used.
-
This can be the same Type if all items are similar, or different if you have multiple equipment types within the same queue
-
-
Queries: Displays the filters that were applied to generate the list of items within the Assessment Queue
-
Tabs
-
Pending: A list of items where the Assessment has not yet been started
-
Draft: A list of items where the assessment has been started and saved as draft
-
Completed: A list of the items where the Assessment has been completed and finalized
-
-
-
Once the Assessment Queue has been saved, the user can then begin the assessments by selecting Inspect in the left-hand column
-
When the assessment as completed, the user may Finalize the Assessment Queue to remove it from their task list (see Tasks for more detail)
Creating a Recurring Queue
Once an Assessment Queue has been created, a user is able to create a recurring queue to happen at a time interval of their choosing. This is often used for required monthly or annual inspections, which can be assigned months or years in advance to ensure nothing slips through the cracks.
To create a Recurring Queue:
-
Select “Create Recurring Assessment Queue” from the menu bar
-
The recurrence schedule (e.g., Every 1 Month till 12/12/2022)
-
Select Save, and you will be redirected to the Assessment Queue landing page. Simply refresh this page to see all of the items that have been created
Activating an Assessment Queue
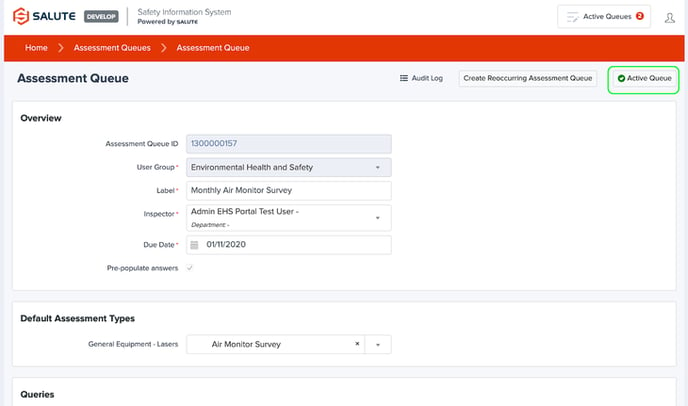
When a user is responsible for conducting the Assessment in a Queue, they are able to Activate that Queue by selecting Activate Queue in the Upper Right hand corner of the screen. This is used to enable easier access on mobile devices.
When a user has “Activated” a queue, scanning the QR code of any item in that queue will automatically take the user to the Assessment associated with that queue. It can be as simple as scanning, and selecting finalize to complete an entire assessment if the user has set it up that way and no Findings have been identified.
Note: An activated Queue will only change the QR code functionality for that user. To view all active Queues, select the Active Queues list from any screen in the upper right corner.
Assessment from: Item Page
A common workflow in Salute is to launch an Assessment from the detailed page of an object (location, equipment, permit, etc.) within the system. This can be started by navigating to that items page in your browser (see relevant section of this User Guide) or by scanning a QR code associated with this item.

To start an Assessment:
-
Select “Add Related” at the top of the item page, and select “Assessment”
-
Once selected, the user will be redirected to a New Assessment with fields such as object and responsible person pre-populated based on details from the original item

Assessment from: Assessment Queues
Assessment Queues are a unique and powerful tool from Salute that enables you to schedule and assign one or more Assessments to be conducted.
To create an Assessment Queue:
-
Visit the landing page for any object of an assessment, such as Chemical Hoods.
-
Create any filter, and the Button “Save Filtered as Queue” will appear.

-
Select “Save Filtered As Queue” to create a new Assessment Queue
-
You will be redirected to a New Assessment Queue page
-
From the New Assessment Queue page, you can define:
-
User Group: Define the group of users that will have access to this Assessment Queue (if applicable)
-
Label: Provide an easy to remember label that is consistent with the best practices established by your organization
-
Inspector: Determine who will be responsible for conducting the Assessments in the Queue. This must be one person, but this can be anyone within your organization as long as they have been given the appropriate access by an Admin user. (Contact an Admin within your organization to determine if this user has the right level of access)
-
Due Date: Determine the date by which all assessments in the Queue should be complete
-
Pre-populate answers: If selected, the questions on the checklist will default to Yes, or if a dropdown they will default to the first value. This is used when there is a large volume of assessments and the Inspector is primarily validating that everything was done
-
Default Assessment Types: For each type of item in the Queue, define which Assessment Type should be used.
-
This can be the same Type if all items are similar, or different if you have multiple equipment types within the same queue
-
-
Queries: Displays the filters that were applied to generate the list of items within the Assessment Queue
-
Tabs
-
Pending: A list of items where the Assessment has not yet been started
-
Draft: A list of items where the assessment has been started and saved as draft
-
Completed: A list of the items where the Assessment has been completed and finalized

-
-
-
Once the Assessment Queue has been saved, the user can then begin the assessments by selecting Inspect in the left-hand column
-
When the assessment is completed, the user may Finalize the Assessment Queue to remove it from their task list (see Tasks for more detail)